
Clean-installing Windows 11 may soon result in the operating system encrypting your drives without asking. Not just the system drive but all drives. And not just in Pro SKUs but Home as well. Why is this a problem, you may ask? The initial setup experience does not mention that, so unsuspicious users may lose their data after discovering that they do not have decryption keys after reinstalling Windows.
In a nutshell, the problem is that Microsoft won't let users decide whether to encrypt their drives or just warn them about it.
Although the story about automatic encryption broke out this week, Microsoft quietly announced the change as part of build 25905 in July 2023:
Starting with this build, we have adjusted the prerequisites (removal of Modern Standby/HSTI validation and untrusted DMA ports check) for enabling device encryption so that it is automatically enabled when doing clean installs of Windows 11.
You can make sure your fresh Windows 11 installation does not encrypt drives by either modifying the install image or tweaking the registry at the beginning of the onboarding experience, which is also known as OOBE.
Option 1: Disable encryption in Windows Registry
After hearing the startup chime, Windows 11 will prompt you to select the right country or region. At this point, you need to open Windows Registry and tell the OS not to encrypt your drives.
- Press Shift + F10 (or Shift + Fn + F10), type regedit, and press Enter. This will launch the Registry Editor.
- Go to Computer\HKEY_LOCAL_MACHINE\SYSTEM\CurrentControlSet\BitLocker and right-click the BitLocker key (folder).
- Select New > Dword (32-bit) Value and rename it to PreventDeviceEncryption.
- Open the newly made value and change its value data from 0 to 1 (via Deskmodder).

- Close the editor and Command Prompt, then proceed with the onboarding experience as usual.
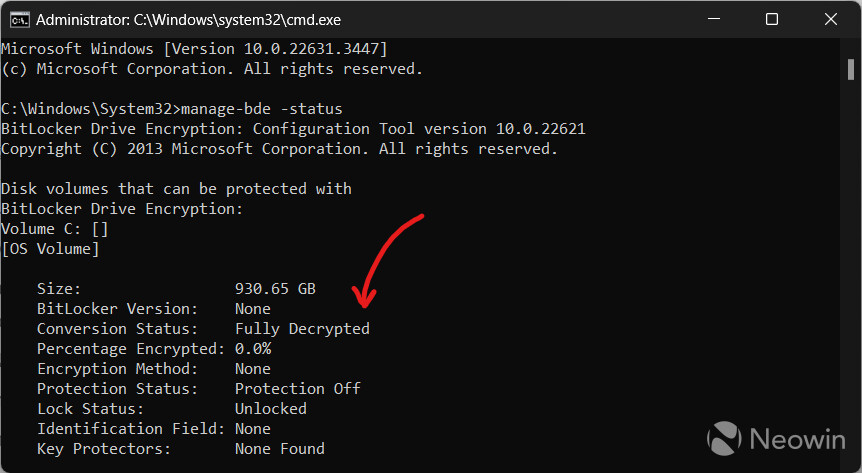
To check your drives' encryption, launch Command Prompt as Administrator and type manage-bde -status. Command Prompt will return the list of your drives, so check the "Conversion Status" field—it should say "Full Decrypted."
Option 2: Modify a Windows 11 image
If you want a more user-friendly or permanent solution, say, you want to install Windows 11 on a couple of machines, then modifying a Windows 11 image is a better option that will save you some time. A third-party app called Rufus will help you prevent Windows 11 from encrypting your device.
- Download Rufus from its official website.
- Get a Windows 11 image from the official website or the Media Creation Tool.
- Connect a USB drive, select the image, and click Start.
- Rufus will prompt you to select a few options to improve your user experience. The one you need is at the very bottom, called "Disable BitLocker automatic device encryption."

- Once you finish creating your media, install Windows 11 as you usually do.
Note that disabling automatic disk encryption will not prevent you from using BitLocker in the future.


98 Comments - Add comment